I would find it very hard to live a life without cake - it would be a very rare occasion that you would walk into our kitchen and not be able to find a slice of homemade cake or a sweet treat to go with a mid morning or afternoon cuppa (and even then there is probably a secret stash in the freezer too). But a few of my friends and Brighton Bakery customers aren't able to enjoy regular cakes as most cakes use regular wheat flour, and that's no fun if you're gluten intolerant.
So I'm particulary sympathetic to those who are are gluten intolerant, especially as a lot of the gluten free treats I've tried on sale in the supermarket are far inferior in taste and texture to their wheat based versions. I've dallied with a few GF recipes in the past for our market stalls and for various cakes I've made. An excellent book I use a lot is Harry Eastwood's Red Velvet Chocolate Heartache, where all the recipes can be made with either regular or gluten free flour, and they have the added bonus of being better for you as they use grated vegetables and ground almonds to reduce the fat and sugar content in the cakes.
So when I was asked to make a gluten free chocolate cake this recipe book was the first one I pulled off the shelf. The Light Chocolate Cake looked perfect, which uses grated butternut squash in the batter to keep in lovely and moist. Well how glad am I that I did a trial run of this cake, as it turned out to be a disaster! The cake took more than twice as long as it should have done to cook and despite the lovely quality ingredients and expensive organic cocoa powder I used it tasted really bland. Oh dear - having ticked and starred nearly every recipe I've tried in this book, this one got a big fat cross (I've carried on my mum's tradition of marking up her recipes - it's so handy when you try as many things in as many cookery books as I have).
I decided that I could do much better by tinkering with my favourite regular chocolate cake recipe instead. It turned out so well that I thought I would share the recipe with you - next time your gluten intolerant friends are round for tea you can let them eat cake.
Emily's Gluten Free Chocolate Cake Recipe
serves 25 party portions or 10-12 big slices
165g very soft butter
300g golden caster sugar
2 teaspoons vanilla extract
3 medium eggs
265g gluten free flour (I use Dove's Farm)
3 level teaspoons gluten free baking powder
1 level teaspoon xanthan gum
1 level teaspoon bicarbonate of soda
70g good quality cocoa powder (I like Green & Blacks)
250ml buttermilk
3-4 tablespoons milk
1. Preheat the oven to 180C and grease and line an 8" round deep cake tin.
2. In a large bowl, beat together the softened butter, sugar and vanilla with electric beaters or a freestanding mixer until pale and fluffy.
3. Gradually add the eggs to the mixture, one at a time, beating really well after each one (it's important to add them slowly and mix well otherwise the mixture can curdle).
4. Mix together all your dry ingredients really well and pass through a sieve to ensure the baking powder is evenly distributed.
5. Using a big metal spoon, fold about a third of the flour mix into the batter. Follow this by folding in about a third of the buttermilk, then keep alternating with the dry mix and the buttermilk until it is all incorporated. Finally add the milk so that you have a happy cake batter consistency (I find that the GF flour absorbs more liquid than regular flour - it's better to have a slightly looser batter than one that's too stiff as it can end up dry).
6. Bake for about 1 hour to 1 hour 10 minutes - if a skewer dipped in the centre comes out clean then it's done. Cool in the tin for at least 5 minutes before tipping on to a wire rack to cool completely.
7. Once cool you can cut the cake into layers and fill with your favourite icing - I think the best is a chocolate meringue buttercream but you could use a ganache or any filling you like. The cake should keep in an airtight container for up to a week.
I got some lovely feedback from the lady I made the cake for - she said the guests at the wedding couldn't tell any difference from a regular cake and the bride was thrilled she could actually eat the cake for once!

Showing posts with label recipe. Show all posts
Showing posts with label recipe. Show all posts
Wednesday, 9 May 2012
Wednesday, 7 December 2011
Last Minute Christmas Cake!
Yes I should really know better, being a *proper* baker now and all, but my family Christmas cake is still, as yet, unbaked. My dad is a big fan of Christmas cake and I'm also hoping to convert certain non-believers in my family with this one so I have a big challenge ahead.
Usually Christmas cakes, like most rich fruit cakes are matured for at least two months before eating. There are a few reasons for this - one, it develops and deepens the rich flavour; two, you can give your cake regular "feeds" with brandy (or other spirits of your choice) to add even more flavour, moistness and festivity; and three, it makes the cake cut better without crumbling, which is particularly important for a wedding cake, where the cake must be cut into lots of small portions.
So how do you cheat it? According to Jane Asher, the secret is to boil the fruit mixture with whisky, stout, orange juice and treacle for ten minutes and leave overnight before adding the rest of the ingredients. She claims it will give the same "matured" flavour, and can be made as close to Christmas as you like.
So I'm putting her to the test, although I am making a few alterations to her recipe, mainly in the addition of ground almonds, lemon and swapping the whisky for Drambuie. I would normally lean towards using brandy, but I inherited the bottle of Drambuie along with several slightly leftfield spirits in the drinks cabinet when my grandpa died and I've been waiting for a reason to use this one. Plus it means there will be a memory of him in our Christmas celebrations, which makes me happy.
I've just boiled up the fruit and I have to say it has already put me in the Christmas spirit, as the house is filled with delicious festive aromas. And as it's the season of giving, I thought I would share with you my version of Jane's recipe. I will report back in the New Year with the family's verdict!
Last Minute Christmas Cake Recipe
(makes 1 x deep 8 inch round cake)
200g currants
200g raisins
100g sultanas
100g dates, chopped
75g dried prunes, chopped
75g dried figs, chopped
150g glace cherries, halved
100ml Drambuie
225ml Guinness (a little nod to my lovely wife's Irish heritage)
Zest of 1 orange and 1 lemon
Juice of 1 orange and 1/2 lemon (to make 75ml)
2 tablespoons black treacle
200g butter, softened
200g muscovado or dark brown sugar
200g plain flour
50g ground almonds
5 medium eggs, lightly beaten
1 1/2 teaspoons mixed spice
75g blanched almonds, chopped
1. Take a large saucepan and fill the pan with the dried fruit, Guinness, Drambuie, orange and lemon juice and zest and treacle. Bring the mix to the boil and simmer gently for ten minutes, stirring every so often. I like to add a bit of Irish Christmas spirit by singing out loud very badly to The Pogues' Fairytale of New York as I'm stirring, but that's optional.
2. Take the pan off the heat and leave to cool. Once it's cold, tip the mix into a bowl, cover and chill in the fridge overnight.
3. The next day, preheat your oven to 140C and double line an 8" round cake tin with parchment. Make sure your parchment is a good 4 inches tall as the cake is quite deep and can rise higher than your tin.
4. Seive the flour, baking powder and spices into the bowl of your mixer, then add all the remaining cake ingredients except the chopped nuts and beat thoroughly until smooth.
5. Fold in the fruit mixture and chopped nuts. At this stage you can add good luck by asking everyone in the house to give the mix a stir**.
6. Pour the mix into your prepared tin and smooth the top, making a dip in the middle so that it rises up evenly.
7. Bake the cake for 3 hours and check with a skewer to see if it's done. It may need 30-60 minutes more so keep checking every so often and cover the top with foil if it's browning too much on top.
8. Cool the cake in its tin for 10 minutes before turning out to cool completely.
9. Once cool, wrap the cake in baking parchment, then foil and keep somewhere cool until ready to ice. Feed the cake by skewering a few holes and drizzling over 1-2 tablespoons of Drambuie every few days.
**I remember the tradition of stirring the cake mix when my mum made our Christmas cake every year and I loved the chance to be involved from a really young age, when I had to stand on a chair to reach the bowl. We also did this at our primary school, and all 100 pupils plus all the teachers would line up in the Dining Hall at lunchtime to stir the giant mix in the bowl. I wonder if any schools still do that? I hope so.
UPDATE 8th December: I baked my cake today - it took nearly 4 hours in total and it's a lovely deep cake and smells beautiful, just like my mum's Christmas Cake. It's still cooling now, and I can't wait to eat it!
Saturday, 24 September 2011
A journey of discovery - Classic Apple Date & Walnut Chutney
I've never been a fussy eater, and my family will testify to the fact that as a child I would always greedily finish every scrap of whatever was put on the plate in front of me. And then ask for seconds. But there are just a very few exceptions to this - I have always had a dislike and a completely irrational fear of 3 things: baked beans, tomato ketchup and chutney. Especially chutney. I had never actually tried it, but just looking at a jar of something worryingly brown and alien with little cubes of unidentified vegetables that's neither liquid or solid and both sweet and pungently vinegary freaked me out so much that I was scared to have any where near my plate.
But a few years ago this all changed. Melissa and I had our very first vegetable patch, and that September we were overrun with so many delicious homegrown courgettes and green tomatoes we didn't know what to do with them. Not wanting to waste our lovely produce we'd spent so long nurturing, I reluctantly had a stab at the Courgette and Tomato Glutney recipe in the River Cottage Preserves Handbook. This may just have been one of those rare occasions where I was wrong. (Yes Melissa - you now have that in writing for all to see!) Of course using our homegrown vegetables made it extra special, but this recipe was really good and I was converted. We gave jars away as Christmas presents and have done the same every year since.
For a while I thought we only ever needed this recipe - it wasn't too sweet or too acidic, just a really good balance of lovely flavours. And to be honest, I was still a bit scared to try another recipe, in case my irrational fear came back. But last year I discovered a fantastic recipe for Apple Date and Walnut Chutney. And it might just go one better than the River Cottage recipe - sorry Hugh!
With 3 carrier bags of apples from my dad's garden in need of preserving I thought this would be the perfect chutney to add to our collection for the next Brighton Bakery stall (at The Lantern Fayre on The Level on 8th October - more details soon!). For those of you that can't make it down to Brighton to buy a jar, I thought I would share my recipe, inspired by this one by West Ealing Abundance.
Oh and be warned - the peeling and chopping does take ages (as with all chutneys) so make sure you have several hours free and plenty of patience to make this, I promise you won't be disappointed with the result. This recipe can always be halved if you'd prefer less chopping!

My Classic Apple Date & Walnut Chutney Recipe
Makes 15 x 340g jars
6 large brown onions, chopped
2.4kg cooking apples, peeled, cored & diced (prepared weight)
800g dates, chopped
250g walnuts, chopped
630ml cider vinegar
240ml balsamic vinegar
250g soft brown or demerara sugar
8tsp mustard seeds
8tsp finely grated fresh root ginger
450ml water
a little oil
1. Start by preparing and chopping the apples, onions and dates - these should be chopped fairly small and evenly - you want them all about the same size.
2. Grease a very large maslin pan with a little oil and add the cider and balsamic vinegar, the sugar, mustard seeds, ginger and water. Stir over a low heat (without boiling) until the sugar dissolves into the liquid.
3. Add the remaining ingredients (apples, onions, dates and walnuts) and give it a good stir with a long wooden spoon. Turn the heat up to medium and bring to the boil. This will take a while as there is lots in the pan - stir it every so often and liquid will start to rise and it will start to bubble.
4. Simmer the mixture very gently, for about an hour and a half, until thick and pulpy, but with the chunks of apple still clearly discernable. Stir the mixture occasionally, more frequently near the end to ensure it doesn't catch and burn on the bottom of the pan. You'll know when it's done when no excess liquid remains and you can draw your spoon across the bottom of the pan and reveal the base for a couple of seconds.
5. Pour into warm, sterilised jars while still hot and cover immediately. Mature for 2 months to develop the flavours before eating. The chutney will keep well for a year.
Here's how mine went, step by step:
I hope you try this recipe out, it's a real winner. I'd love to hear how yours turns out if you do!
But a few years ago this all changed. Melissa and I had our very first vegetable patch, and that September we were overrun with so many delicious homegrown courgettes and green tomatoes we didn't know what to do with them. Not wanting to waste our lovely produce we'd spent so long nurturing, I reluctantly had a stab at the Courgette and Tomato Glutney recipe in the River Cottage Preserves Handbook. This may just have been one of those rare occasions where I was wrong. (Yes Melissa - you now have that in writing for all to see!) Of course using our homegrown vegetables made it extra special, but this recipe was really good and I was converted. We gave jars away as Christmas presents and have done the same every year since.
For a while I thought we only ever needed this recipe - it wasn't too sweet or too acidic, just a really good balance of lovely flavours. And to be honest, I was still a bit scared to try another recipe, in case my irrational fear came back. But last year I discovered a fantastic recipe for Apple Date and Walnut Chutney. And it might just go one better than the River Cottage recipe - sorry Hugh!
With 3 carrier bags of apples from my dad's garden in need of preserving I thought this would be the perfect chutney to add to our collection for the next Brighton Bakery stall (at The Lantern Fayre on The Level on 8th October - more details soon!). For those of you that can't make it down to Brighton to buy a jar, I thought I would share my recipe, inspired by this one by West Ealing Abundance.
Oh and be warned - the peeling and chopping does take ages (as with all chutneys) so make sure you have several hours free and plenty of patience to make this, I promise you won't be disappointed with the result. This recipe can always be halved if you'd prefer less chopping!

My Classic Apple Date & Walnut Chutney Recipe
Makes 15 x 340g jars
6 large brown onions, chopped
2.4kg cooking apples, peeled, cored & diced (prepared weight)
800g dates, chopped
250g walnuts, chopped
630ml cider vinegar
240ml balsamic vinegar
250g soft brown or demerara sugar
8tsp mustard seeds
8tsp finely grated fresh root ginger
450ml water
a little oil
1. Start by preparing and chopping the apples, onions and dates - these should be chopped fairly small and evenly - you want them all about the same size.
2. Grease a very large maslin pan with a little oil and add the cider and balsamic vinegar, the sugar, mustard seeds, ginger and water. Stir over a low heat (without boiling) until the sugar dissolves into the liquid.
3. Add the remaining ingredients (apples, onions, dates and walnuts) and give it a good stir with a long wooden spoon. Turn the heat up to medium and bring to the boil. This will take a while as there is lots in the pan - stir it every so often and liquid will start to rise and it will start to bubble.
4. Simmer the mixture very gently, for about an hour and a half, until thick and pulpy, but with the chunks of apple still clearly discernable. Stir the mixture occasionally, more frequently near the end to ensure it doesn't catch and burn on the bottom of the pan. You'll know when it's done when no excess liquid remains and you can draw your spoon across the bottom of the pan and reveal the base for a couple of seconds.
5. Pour into warm, sterilised jars while still hot and cover immediately. Mature for 2 months to develop the flavours before eating. The chutney will keep well for a year.
Here's how mine went, step by step:
 |
| All the ingredients filled my maslin pan nearly to the brim! |
 |
| After an hour it has reduced and turn a lovely deep colour |
 |
| It took 10 attempts to take this picture revealing the bottom of the pan! |
|
| Do I really have to wait 2 months to try this? :o( |
Friday, 16 September 2011
Damson and Sloe Gin Jam
Damsons are a proper old school English fruit, a small plum with indigo skin and green flesh, about the size of a queen olive. I'm lucky enough to have grown up with a damson tree in our back garden which faithfully produced a great crop every year of these little blue beauties. They made their way into many a good damson crumble throughout my childhood.
Now that my brother and I have left home, even though my dad loves a crumble and happily eats it for breakfast, there are way too many for him to get through on his own. Luckily I'm here to rescue the whole crop every year to turn into jam - it would be a crime to let them rot on the tree.
This year Melissa and I gathered just over 1.5 kilos which we rushed back to Brighton to make into a beautiful preserve (I learned the hard way last year that damsons don't last long at all once picked). This just happened to be the perfect amount for my Damson & Sloe Gin Jam recipe. The sloe gin adds an extra dimension without being overpowering and it has a lovely set - perfect for spreading onto hot buttered crumpets or on a scone with clotted cream and a pot of tea. Mmmm.

Damson & Sloe Gin Jam
Makes about 6 x 340g jars
1.5kg damsons
1.25kg granulated sugar
50ml sloe gin
1. Start off cutting each damson in half and removing the stones (there's no need to wash the fruit beforehand). Place a side plate in your freezer for later.
2. Pop the stoned damsons in a large preserving pan and cover with 400ml water. Bring the fruit up to a simmer and cook gently until the skins have softened and the flesh is tender (about 25 minutes, but keep checking). While this is happening, sterilise your jars and lids.*
3. Once the fruit is tender, add the sugar to the pan and stir until the crystals have all dissolved. Bring the mixture up to a full rolling boil until you reach the setting point,** usually about 12-15 minutes. Remove from the heat. If you notice the fruit is bobbing on the surface then give it another couple of minutes as it's probably not cooked enough for the fruit to have absorbed the sugar.
4. Stir in the sloe gin (bask in the lovely aroma mmmm) and pour into your sterilised jars while still hot and cover immediately. This deep purple preserve will keep well for a year in a cool dark place - refrigerate after opening.
I hope you enjoy the recipe - if you make it please leave a comment and let me know how it turns out!
* To sterilise jars, I wash the jars in very hot soapy water and rinse clean and leave to drain. Then place the jars upright in a large roasting tin lined with a teatowel and dry the jars in a low oven at 120C for about 20 minutes. Keep them warm until ready to use. Sterilise the lids by boiling in a pan of water for 10 minutes.
** To test for a set, the foamy bubbles will have given way to deeper glossier bubbles and it starts to look more jammy. Take your side plate out of the freezer and place a teaspoonful on the plate and leave for a minute (take the jam off the heat while you're testing so it doesn't over set). Push the jam with your little finger - if it crinkles then the jam is done, if not give it another couple of minutes at a rolling boil and test again.
Friday, 12 August 2011
White Chocolate, Almond & Apricot Cookies
As you may be able to tell from this blog, I love to experiment with new recipes and ideas in the kitchen. To be honest, I'm not even sure I can ever follow a recipe exactly word for word, not that I have a problem with being told what to do, but more often it's that I'm not usually organised enough to have all the ingredients in the cupboard in advance, so I have to improvise.
This cookie recipe came about in just such a way. I was in a baking mood, and while flicking through my copy of River Cottage Everyday for inspiration I stumbled upon a recipe for Ten Minute Chocolate Chip Cookies. I was in a greedy mood and the speedy rewards promised by this recipe made it instantly appealing. I didn't have any chocolate chips in the cupboard, but I happen to think that the flavour combination I tried instead was a real winner, so I thought I would share it with you.
White Chocolate, Almond & Apricot Cookies
Makes 14-16 generous cookies
125g unsalted butter
100g caster sugar
75g soft light brown sugar
1 medium egg, lightly beaten
1 teaspoon vanilla extract
150g plain flour
1/2 teaspoon baking powder
A pinch of sea salt
50g white chocolate, chopped
75g blanched almonds, roughly chopped
75g dried apricots, chopped
1. Preheat the oven to 190C (170C fan assisted) and line two baking sheets with baking parchment.
2. Gently melt the butter in a small saucepan. Meanwhile add the sugars to a large bowl, then beat in the melted butter well with a wooden spoon.
3. Next beat in the eggs and vanilla extract. Once it's nicely mixed, sift the flour, baking powder and salt into the bowl and stir them in. Finally add the chopped white chocolate, almonds and apricots and you'll end up with a nice sloppy mixture.
4. Spoon blobs of the mixture onto your prepared trays using a dessertspoon - make sure you leave about 4cm between each as the cookies really spread out while cooking. If you don't then you'll just end up with one big cookie!
5. Place in the oven and bake for 8-10 minutes until the cookies are just beginning to turn golden brown. As with all biscuits, they will firm up as they cool so don't worry if they still feel very soft.
6. Leave on the hot trays for a couple of minutes before transferring to a wire rack to cool completely.

Happy baking :o)
Tuesday, 12 July 2011
Preserving the Brighton Bakery garden bounty - part 1
It's this time of year that I really love having a kitchen garden. We've already had plenty of rocket, salad leaves and herbs and a handful of broad beans (no thanks to the slugs) but the first 'proper' crops have now started to appear. Yesterday Melissa and her mam picked the first harvest of juicy gooseberries from the bush, which I had planned to make into a pie, but unfortunately the crop was a bit smaller than we had thought. In fact it wasn't even a third of what we needed! So I changed tack and made a lovely gooseberry compote which we devoured over ice cream last night.

Gooseberry Compote
makes enough to drizzle over 4 bowls of ice cream
220g gooseberries
2 tablespoons water
2 tablespoons golden caster sugar (or to taste)
Top and tail the gooseberries and pop into a small saucepan with the water and sugar.
Bring to the boil and simmer gently for about 10 minutes.
Taste towards the end and adjust to your own taste by adding a little more sugar to make it sweeter (or a little lemon juice if you prefer it a bit sharper).
Leave to cool and chill in the fridge.
Perfect on top of vanilla icecream or for breakfast added to a bowl of yoghurt and granola.
You can also make this into gooseberry fool by gently folding the compote into whipped double cream - divine.
We didn't stop with the gooseberries either - stayed tuned for part 2 and a fantastic relish made from our purple beetroot.
Monday, 13 June 2011
More recipe trials - eggless chocolate cupcakes
To the untrained eye, it might seem like I am trying to avoid redecorating the spare bedroom today, but since the oven was already hot from the Sunshine Marmalade Flapjacks coupled with the fact it gave me an excuse to use my lovely birdie cup measures, I decided to tackle an intriguing vegan chocolate cake recipe I found on the internet yesterday.

There are quite a few versions of this cake on various websites, but the Suzanne Martinson recipe I plumped for was highly recommended on a forum so I figured it must be a good one. What's handy is that you're likely to have all the ingredients in your cupboard already, even the egg substitute, which by the way is vinegar. Yep, I agree it sounds disgusting, but if you know me by now, this only made me more curious to try it. I already have quite a few cake recipes on the list for the next market so I thought I would try this recipe as cupcakes instead.
Try as I might, I just couldn't imagine how using cider vinegar in place of eggs in a cake recipe could possibly taste good let alone still deliver the indulgent richness a good chocolate cake really needs. But like Alice down the rabbit hole I went and if they were going to go wrong then nobody needed to know. The first thing I was pleasantly rewarded with was how simple and quick it was to make the batter - no bingo wing busting creaming butter and sugar, no worrying about the mixture curdling as you add the eggs, just sift together the dry ingredients, stir together the wet ingredients then mix. Easy peasy. Then finally add the magic ingredient of the cider vinegar which curiously fizzes up as it reacts with the baking soda and makes you feel slightly like a mad scientist. Then the only stressful bit is making sure you get the mixture in the oven as quickly as possible after adding the vinegar.
I was suprised that the cakes rose much better than I had expected in the oven, and just 20 minutes later I was rewarded with 11 brunette beauties (in hindsight a couple were overfull so this mix would make 12 comfortably).

Because I have the winning combination of being both greedy and impatient I had to try one while it was still hot from the oven. Curiouser and curiouser, these cakes are really good! Who would have thought it. I might even go as far as saying they are better than most chocolate cakes I've tried - they're moist, rich and chocolatey, not too heavy and you would never know they were made with vinegar instead of eggs. I also tried one once they had cooled down in the name of quality control and can confirm that yep they are still yummy.
I have to say though, the raspberry and chocolate glaze that Suzanne recommends for the top is pretty horrible and I'm glad I tasted it before ruining the cakes with it. I don't think it really needs a glaze in any case. I might consider adding some dark chocolate chips though for a bit of added texture.
So my only dilemma now is whether I promote these cakes as vegan on the stall - will this put non-vegan people off buying one? I'll have to put my thinking cap on again to come up with a good name :o)
Exciting news & marmalade flapjacks recipe trials
I must start this post by sharing some very exciting news. A few weeks ago, Melissa and I entered the First Pitch competition for new businesses run by the National Market Traders' Federation. We are thrilled that we have just qualified for the first round and have been given five days' free test trading at Worthing Outdoor Market - every Wednesday from 29 June. During this time the NMTF will assess us to see if we are good enough to be one of the 50 shortlisted businesses to go through to the next round, which will give us a whole year's trading at reduced rates with invaluable on-site mentoring from the NMTF. At the end of the year the overall winner will receive £2000 so I now have even more pressure on finding the right recipes for this and our upcoming stall at the Picnic in Queen's Park a week on Sunday.
So today's recipe trial is for Lemon Marmalade Flapjacks. Now these were delicious and went down a storm at the Kemptown Carnival a couple of weeks ago, so why mess with a good thing? Well I was hoping that I might be able to substitute the butter in the recipe for sunflower oil so that they would be suitable for vegans. But would they still taste as good?
After some fruitless scouring on the internet about how to substitute oil for butter in a recipe (and using vegan margarine just didn't seem right) I just decided to go with my gut instinct. So here's my adapted version of Dan Lepard's original marmalade flapjack recipe:
Sunshine Marmalade Flapjacks (makes 16)
200g dried apricots
200ml sunflower oil
125g dark soft brown sugar
150g lemon marmalade (try my recipe for Sunshine Marmalade)
Finely grated zest of 3 lemons
2 scant tbsp black treacle
400g rolled oats
1. Chop the apricots into chunks about the size of raisins and cover boiling water. Set aside for 10 minutes then drain off the excess liquid.
2. Heat your oven to 180C (160 fan-assisted) and line a baking tray with foil - 25cm square is ideal.
3. Heat the oil in a large saucepan, add the brown sugar, lemon marmalade, lemon zest and treacle, and bring just to a boil. Remove from the heat and stir in the oats and drained apricots until well mixed.
4. Spoon the mixture into the tin and squish it down evenly, making sure it fills all the corners (incidentally when I did my trial I made 1/2 the quantity and just filled up to halfway across the tin and the mixture was completely well behaved and remained in fat flapjack yumminess).
5. Bake in the middle of the oven for about 25 minutes, until lightly coloured at the edges. Dan says that the timing is slightly tricky to get right - if you bake it too long, the flapjacks turn rock hard when cold; bake it too little and they crumble - I did mine for 27 minutes and they were perfect.
6. Remove from the oven and cut into squares in the tin once they are cooled a little but still warm.
And the verdict? Well, adopting my favourite Larry David accent, I have to say these were pretty pretty good. The lemony treacliness gives these flapjacks such a lovely flavour that you don't miss the butter. All in all I don't see any reason why these can't be made with sunflower oil going forwards - it has the added bonus of being vegan, lower in saturated fat and easier on your wallet!
Wednesday, 4 May 2011
Apple crumble in a muffin
Not for the first time in our kitchen, and you can bet your bottom dollar it won't be the last, I have persuaded Melissa that I have to do some baking, under the thinly veiled excuse that something or other needs using up. In fact, even as we speak that caster sugar in the cupboard is looking like it's on it's last legs... ;o)
As it happens, we did have some lovely British Bramley apples that were crying out to be used in a delicious teatime treat. I really love a good old apple crumble and wanted to experiment to see if I could translate my traditional favourite pud into a muffin which can be eaten without needing the Sunday roast beforehand. Actually, as I write this I recall that it has been known that my dad is fond of eating crumble for breakfast, but maybe that's just him...
And if I do say so myself, these made up muffins are really rather good.

Apple Crumble Muffins Recipe (makes 12 big ol' muffins)
150g plain white flour
150g plain wholemeal flour
1 tbsp baking powder
Pinch of salt
190g golden caster sugar
210ml milk
1 large egg, beaten
100g butter, melted
1 1/2 tsp cinnamon
about 400g bramley apples
For the crumble topping:
15g cold butter, diced
25g plain flour
15 demerara sugar
1. Preheat the oven to 200C and line a muffin tin with cases.
2. Make the crumble topping by rubbing together the cold butter and flour until it looks like couscous, then stir in the demerara sugar. Squish it together a little to form nuggety lumps and set aside.
3. Peel and core the apples then chop into pieces the size of small blackberries.
4. In a large bowl mix all the dry ingredients, and in a separate bowl whisk together the milk, egg and melted butter. Add the wet mixture into the dry and stir until nearly combined, then add the chopped apples. Try not to overmix as this will make the muffins rubbery.
5. Spoon the mixture evenly into the lined muffin tin and top each with a generous sprinkling of the crumble mix. Bake for 20-25 minutes until risen and golden.
PS if you wanted to try apple and blackberry muffins use 150g blackberries and 250g Bramley apples and substitute the cinnamon with the zest of 1 lemon. You could also add 25g chopped pecans or walnuts to the crumble topping for extra texture.
As it happens, we did have some lovely British Bramley apples that were crying out to be used in a delicious teatime treat. I really love a good old apple crumble and wanted to experiment to see if I could translate my traditional favourite pud into a muffin which can be eaten without needing the Sunday roast beforehand. Actually, as I write this I recall that it has been known that my dad is fond of eating crumble for breakfast, but maybe that's just him...
And if I do say so myself, these made up muffins are really rather good.

Apple Crumble Muffins Recipe (makes 12 big ol' muffins)
150g plain white flour
150g plain wholemeal flour
1 tbsp baking powder
Pinch of salt
190g golden caster sugar
210ml milk
1 large egg, beaten
100g butter, melted
1 1/2 tsp cinnamon
about 400g bramley apples
For the crumble topping:
15g cold butter, diced
25g plain flour
15 demerara sugar
1. Preheat the oven to 200C and line a muffin tin with cases.
2. Make the crumble topping by rubbing together the cold butter and flour until it looks like couscous, then stir in the demerara sugar. Squish it together a little to form nuggety lumps and set aside.
3. Peel and core the apples then chop into pieces the size of small blackberries.
4. In a large bowl mix all the dry ingredients, and in a separate bowl whisk together the milk, egg and melted butter. Add the wet mixture into the dry and stir until nearly combined, then add the chopped apples. Try not to overmix as this will make the muffins rubbery.
5. Spoon the mixture evenly into the lined muffin tin and top each with a generous sprinkling of the crumble mix. Bake for 20-25 minutes until risen and golden.
The muffins will keep for a couple of days in an airtight tin or you could freeze half the batch to keep them longer. Enjoy x
PS if you wanted to try apple and blackberry muffins use 150g blackberries and 250g Bramley apples and substitute the cinnamon with the zest of 1 lemon. You could also add 25g chopped pecans or walnuts to the crumble topping for extra texture.
Could this be the weirdest bread recipe ever?
I like to keep a recipe scrapbook of cuttings taken from magazines and Sunday supplements and recipes I've made up myself - it's a great frugal tip for a free recipe book. I rediscovered the first recipe scrapbook I made when searching for something completely different in one of the boxes we are still yet to unpack despite having moved in more than five months ago.
You may have noticed that I tend to lean towards the quirky and leftfield when it comes to the things I pick to bake. Like a magpie that's spotted something shiny, if there's a recipe that uses unusual ingredients or that sounds so bonkers you wouldn't think it would work - that's the one I'll choose. Roll on the bread recipe that calls for treacle, instant coffee, cocoa powder, carrot and caraway seeds among its 13 ingredients. This recipe for Black Bread looks like it was cut out of the Guardian Weekend and I thouroughly recommend it for entertainment value alone. Let me walk you through the bizarre instructions for this loopy loaf.
Black Bread Recipe
150g spelt, rye or wholemeal flour
7g easy-blend yeast
1 tsp muscovado sugar
2 tbsp cocoa
2 tbsp instant coffee
75g treacle
3 tsp fennel, caraway or cumin seeds
50g unsalted butter
150g coarsely grated carrot, parsnip or celeriac
325g strong white flour
2 tsp fine sea salt
Oil
Sesame seeds
1. Whisk 225ml cold water and 50g of the spelt/rye/wholemeal flour in a saucepan, bring to a boil, tip into a bowl and leave until lukewarm.
 2. Stir in the yeast and sugar, then leave, covered for 45 minutes.
 3. Heat 100ml water with the cocoa, coffee, treacle, butter and fennel/caraway/cumin seeds until the butter has melted.
 4. Leave until lukewarm then add to the yeast mix along with the grated veg.
 5. Add the remaining flour and salt and stir into a soft sticky mess.
6. Rub a tablespoon of oil on both the worksurface and your hands, and give the dough a ten second knead.
 7. Return to the bowl and repeat the ten second knead twice more at ten minute intervals.
8. Shape into a ball, put on an oiled baking tray, sprinkle with sesame seeds and put the whole tray inside a clean plastic bag or bin liner. Leave in a warm place for 45 minutes to an hour.
9. Preheat the oven to 220C. Cut a deep cross in the top of the dough and bake for 20 minutes, then drop the temperature to 180C and bake for 15-20 minutes more. Voila!

The verdict - a really lovely, unusual loaf of bread. I used caraway seeds which gave the bread quite a strong flavour, so I might try fennel or cumin seeds next time. The texture of the bread was really lovely with a soft and springy crumb, perfect for sandwiches as it doesn't crumble easily. It keeps very well - much longer than a regular loaf - although it doesn't really toast properly. Not an everyday bread, but definitely worth the effort and it is now top of my list for the most bizarre bread I've ever made.
PS. In case you've not made bread before, to highlight how wacky this recipe is I will tell you that the basic bread recipe only uses flour, yeast and water, which you simply mix, knead, leave to rise and bake. Boring!
You may have noticed that I tend to lean towards the quirky and leftfield when it comes to the things I pick to bake. Like a magpie that's spotted something shiny, if there's a recipe that uses unusual ingredients or that sounds so bonkers you wouldn't think it would work - that's the one I'll choose. Roll on the bread recipe that calls for treacle, instant coffee, cocoa powder, carrot and caraway seeds among its 13 ingredients. This recipe for Black Bread looks like it was cut out of the Guardian Weekend and I thouroughly recommend it for entertainment value alone. Let me walk you through the bizarre instructions for this loopy loaf.
Black Bread Recipe
150g spelt, rye or wholemeal flour
7g easy-blend yeast
1 tsp muscovado sugar
2 tbsp cocoa
2 tbsp instant coffee
75g treacle
3 tsp fennel, caraway or cumin seeds
50g unsalted butter
150g coarsely grated carrot, parsnip or celeriac
325g strong white flour
2 tsp fine sea salt
Oil
Sesame seeds
1. Whisk 225ml cold water and 50g of the spelt/rye/wholemeal flour in a saucepan, bring to a boil, tip into a bowl and leave until lukewarm.


6. Rub a tablespoon of oil on both the worksurface and your hands, and give the dough a ten second knead.

8. Shape into a ball, put on an oiled baking tray, sprinkle with sesame seeds and put the whole tray inside a clean plastic bag or bin liner. Leave in a warm place for 45 minutes to an hour.
9. Preheat the oven to 220C. Cut a deep cross in the top of the dough and bake for 20 minutes, then drop the temperature to 180C and bake for 15-20 minutes more. Voila!

PS. In case you've not made bread before, to highlight how wacky this recipe is I will tell you that the basic bread recipe only uses flour, yeast and water, which you simply mix, knead, leave to rise and bake. Boring!
Sunday, 17 April 2011
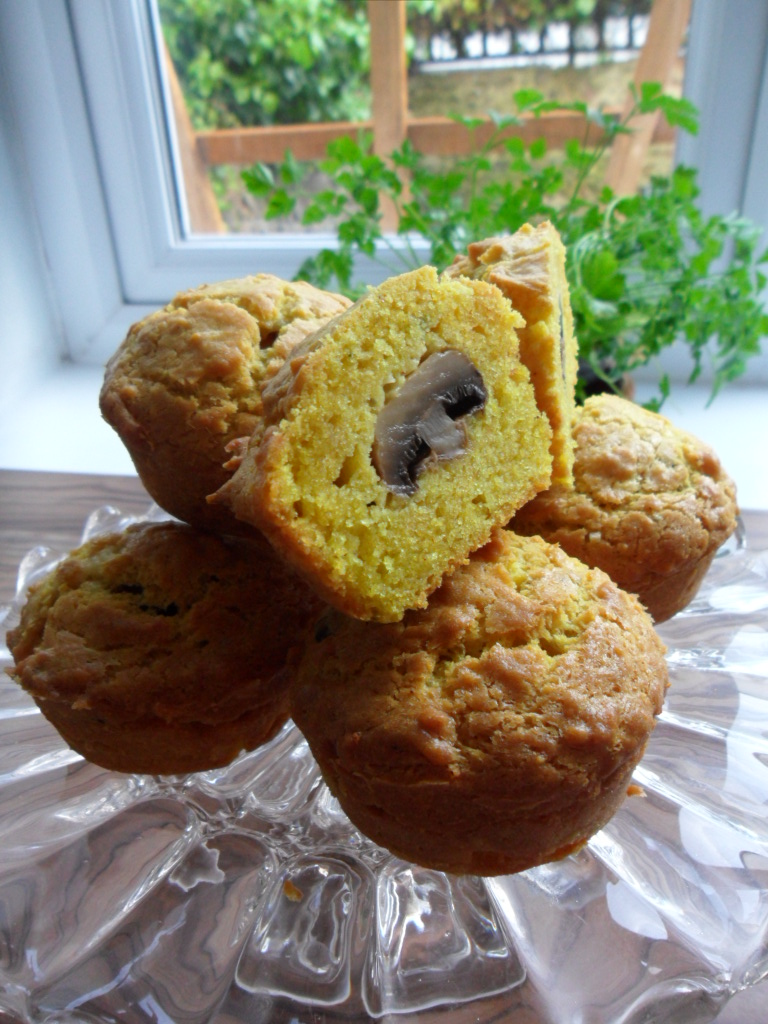
Secret mushroom muffins
A few people have suggested that being in Brighton I should try offering some *special* cakes which might go down well with a certain local clientele. I hope that I'm not disappointing readers of this blog by revealing that the secret mushrooms in these savoury muffins are good old chestnut mushrooms from the local greengrocer.
A little while ago my friend Big Nick sent me a picture for some broccoli muffins as a cool idea for the bakery. I was so intrigued that I scoured the internet for the recipe and discovered one of my now favourite blogs kitchenist.com. Ever since then, my mind has been running at tangents trying to conjure up my own variations on a theme. This is my first attempt, adapted from Ele's broccoli recipe, and they weren't half bad...

Secret Mushroom Muffins Recipe
12 mushrooms (each one should fit comfortably within a muffin mould, but remember they do shrink a bit)
275g softened butter
50g golden caster sugar
4 large eggs, at room temperature
300g plain flour
1 tsp baking powder
2 tsp fresh thyme, leaves picked
1/2 tsp turmeric
1/2 tsp salt
60g mature cheddar, grated
1. Preheat the oven to 180°C. While the oven is preheating, clean the mushrooms and brush with a small amount of butter. Place the mushrooms face down in each hole of your muffin tray and pop in the oven for a few minutes until just tender, then set aside.
2. Using electric beaters, whip up the butter until very soft, then add in the sugar and beat again until light and fluffy. Crack the eggs into a jug and break them up slightly with a fork, then add a little at a time to the butter, beating well after each addition. If it starts to split then you can add a large pinch of the flour which will help bring it back into shape.
3. In a separate bowl mix together the flour, baking powder, thyme, turmeric and salt, then fold this into the butter and egg mix with a spatula, followed by the grated cheese.
4. Make sure you've taken the mushrooms out of the tin (but you don't need to bother cleaning it), then place a heaped tablespoon of the batter in each muffin case. Next stick a mushroom stalk first into each yellow pile and top with another spoonful of batter, spreading the batter out to fill each case and making sure the tops of the mushrooms are well covered.
5. Bake the muffins for about 30 minutes until golden brown and firm on top. Don't worry if some of the butter bubbles out during cooking, I think this helps make a crispier crust. Cool the muffins on a wire rack before serving as a decadent teatime treat or a mid-morning lunchbox snack at your desk. Mmmm.
One thing I would remember for next time is not to use mushrooms that are too small as they do shrink when you cook them and I think it gives a better effect if they fill more of the muffin. I also think the recipe would work well with dried thyme (but use just 1 teaspoon) if you don't have fresh thyme to hand. It's also very easy to halve the recipe if you only want to make 6 muffins as they are at their best eaten within a day or so.
Watch this space as I have plenty more surprise muffins to follow - they all sound good in my head but I hope I can translate these ideas into good recipes...
Happy baking x
A little while ago my friend Big Nick sent me a picture for some broccoli muffins as a cool idea for the bakery. I was so intrigued that I scoured the internet for the recipe and discovered one of my now favourite blogs kitchenist.com. Ever since then, my mind has been running at tangents trying to conjure up my own variations on a theme. This is my first attempt, adapted from Ele's broccoli recipe, and they weren't half bad...
Secret Mushroom Muffins Recipe
12 mushrooms (each one should fit comfortably within a muffin mould, but remember they do shrink a bit)
275g softened butter
50g golden caster sugar
4 large eggs, at room temperature
300g plain flour
1 tsp baking powder
2 tsp fresh thyme, leaves picked
1/2 tsp turmeric
1/2 tsp salt
60g mature cheddar, grated
1. Preheat the oven to 180°C. While the oven is preheating, clean the mushrooms and brush with a small amount of butter. Place the mushrooms face down in each hole of your muffin tray and pop in the oven for a few minutes until just tender, then set aside.
2. Using electric beaters, whip up the butter until very soft, then add in the sugar and beat again until light and fluffy. Crack the eggs into a jug and break them up slightly with a fork, then add a little at a time to the butter, beating well after each addition. If it starts to split then you can add a large pinch of the flour which will help bring it back into shape.
3. In a separate bowl mix together the flour, baking powder, thyme, turmeric and salt, then fold this into the butter and egg mix with a spatula, followed by the grated cheese.
4. Make sure you've taken the mushrooms out of the tin (but you don't need to bother cleaning it), then place a heaped tablespoon of the batter in each muffin case. Next stick a mushroom stalk first into each yellow pile and top with another spoonful of batter, spreading the batter out to fill each case and making sure the tops of the mushrooms are well covered.
5. Bake the muffins for about 30 minutes until golden brown and firm on top. Don't worry if some of the butter bubbles out during cooking, I think this helps make a crispier crust. Cool the muffins on a wire rack before serving as a decadent teatime treat or a mid-morning lunchbox snack at your desk. Mmmm.
One thing I would remember for next time is not to use mushrooms that are too small as they do shrink when you cook them and I think it gives a better effect if they fill more of the muffin. I also think the recipe would work well with dried thyme (but use just 1 teaspoon) if you don't have fresh thyme to hand. It's also very easy to halve the recipe if you only want to make 6 muffins as they are at their best eaten within a day or so.
Watch this space as I have plenty more surprise muffins to follow - they all sound good in my head but I hope I can translate these ideas into good recipes...
Happy baking x
Wednesday, 6 April 2011
Soda bread breakfast scones
We had planned to have some homemade sourdough bread for breakfast on Sunday morning, but when Melissa went to begin the recipe, she discovered that our homemade starter had died from neglect. After a period of mourning we decided to learn the lesson that it definitely needs feeding every day, and said goodbye as Sarah the starter was resigned to the bin.
Still we picked ourselves up and decided to start(er) again, and this time we have a bright pink postit reminder on the starter bowl:

We've decided that before we can get a pet (Melissa has been trying to persuade me to get a cat) we have to prove that we can look after the new starter and remember to feed it. Updates to follow.
As the sourdough starter takes 7-10 days before we can use it to bake bread I needed a new plan. I decided I would get up before the others and bake a batch of soda bread, but instead of a large loaf I thought it would be cute to make individual scones and our guests could wake up to the aroma of freshly baked bread in the morning.

Adapted from a River Cottage soda bread recipe, here's how I made them:
Emily's soda bread breakfast scones recipe
250g plain wholemeal flour
250g plain white flour
2 teaspoons bicarbonate of soda
1 teaspoon fine salt
400ml natural yoghurt
A little milk, if necessary
Preheat the oven to 200C.
Mix the flours, bicarbonate of soda and salt together in a big bowl.
Make a well in the centre and stir in the yoghurt until combined. If the mixture needs it, add a tablespoon or two of milk to bring it together to a soft dough that's not too sticky. You'll need to get your hands in at this point and bring the dough together into a loose ball.
Turn out onto a floured surface and divide into 8 even pieces.
Roll gently into balls and place on a floured baking tray, leaving room around each one for them to rise.
Then with a sharp serrated knife cute a deep cross in each scone to let the fairies out (so the Irish legend goes).
Bake for about 22 minutes or until golden brown and when the biggest scone sounds hollow when tapped underneath.
Perfect with proper butter and homemade jam or marmalade and a strong cup of tea to cure a hangover.

Tuesday, 29 March 2011
Sunshine Marmalade
Over the last few years I have really gotten into jam making and preserving - I'm very happy to while away an afternoon with some theraputic chopping. Often my preserving is a necessity to use up the glut of fruit from my dad's garden or the huge amounts of courgettes and tomatoes from our old West London garden that I lovingly diced up into lipsmacking chutney. We're now down to our last couple of jars of homemade jam so when I saw organic lemons on special offer in the supermarket I jumped at the opportunity to make some marmalade.
Now Melissa's dad Bertie is well known for enjoying our homemade marmalade to the point that he now refuses to go back to the shop bought stuff. But I'm taking a risk by trying my own variation on a theme making a batch of lemon marmalade, especially as I don't have a recipe! I'm trying my luck using my trusty River Cottage Preserves Handbook as a guide.
Emily's Sunshine Lemon Marmalade Recipe
I'll warn you this recipe takes a little time (and overnight soaking) but it's worth it!
1kg unwaxed lemons
75ml lemon juice
2kg granulated sugar
2.5litres water
You will also need a preserving pan or very big saucepan as the mixture is about 6 litres and needs to come up to a fierce bubbling boil!
Scrub your lemons and remove the bellybuttons.
Chop the lemons in half and squeeze out the juice - add the juice to your preserving pan, fishing out any stray lemon pips as you go.
Turn on the radio and start working through your pile of lemon rinds, slicing into shreds with a sharp knife (fine and delicate or thick and chunky - it's up to you). Tumble the yellow crescents into the preserving pan as you go and soon enough you'll end up with a big citrus mountain that looks like this:

Pour over the water and then leave to soak overnight.

The next day bring the pan up to the boil then simmer gently, covered, for about 2 hours - by which point the peel will be tender and the mixture will have reduce by about a third. I don't have a lid for my preserving pan so I used a circle of greaseproof paper on top of the liquid and it worked a treat.
While it's boiling stick a saucer in the freezer for later and when the shreds are nearly ready wash your jars in hot soapy water, rinse clean and leave to drain.
Next turn up the heat and add in the lemon juice and sugar, stirring all the time until the sugar has completely dissolved. Bring the mixture to a rapid rolling boil for about 20-25 minutes until the setting point is reached. While this is happening stick your clean jars on a baking tray in a low oven to dry and sterilise.
To test for a set put a small amount of marmalade on your frozen saucer, leave to cool for a minute then push gently with your finger. If it wrinkles then it's done, if not then boil for another couple of minutes. Alternatively if you have a sugar thermometer it will be done when it reaches 104.5C.
Once it's done, take the marmalade off the heat and cool for 10-12 minutes before pouring into your sterilised jars and sealing immediately.
Then marvel at the stained glass effect you get when you put the jars up against the window!
 The marmalade will keep to brighten up a rainy morning for 2 years. Enjoy!
Now Melissa's dad Bertie is well known for enjoying our homemade marmalade to the point that he now refuses to go back to the shop bought stuff. But I'm taking a risk by trying my own variation on a theme making a batch of lemon marmalade, especially as I don't have a recipe! I'm trying my luck using my trusty River Cottage Preserves Handbook
Emily's Sunshine Lemon Marmalade Recipe
I'll warn you this recipe takes a little time (and overnight soaking) but it's worth it!
1kg unwaxed lemons
75ml lemon juice
2kg granulated sugar
2.5litres water
You will also need a preserving pan or very big saucepan as the mixture is about 6 litres and needs to come up to a fierce bubbling boil!
Scrub your lemons and remove the bellybuttons.
Chop the lemons in half and squeeze out the juice - add the juice to your preserving pan, fishing out any stray lemon pips as you go.
Turn on the radio and start working through your pile of lemon rinds, slicing into shreds with a sharp knife (fine and delicate or thick and chunky - it's up to you). Tumble the yellow crescents into the preserving pan as you go and soon enough you'll end up with a big citrus mountain that looks like this:

Pour over the water and then leave to soak overnight.

The next day bring the pan up to the boil then simmer gently, covered, for about 2 hours - by which point the peel will be tender and the mixture will have reduce by about a third. I don't have a lid for my preserving pan so I used a circle of greaseproof paper on top of the liquid and it worked a treat.
While it's boiling stick a saucer in the freezer for later and when the shreds are nearly ready wash your jars in hot soapy water, rinse clean and leave to drain.
Next turn up the heat and add in the lemon juice and sugar, stirring all the time until the sugar has completely dissolved. Bring the mixture to a rapid rolling boil for about 20-25 minutes until the setting point is reached. While this is happening stick your clean jars on a baking tray in a low oven to dry and sterilise.
To test for a set put a small amount of marmalade on your frozen saucer, leave to cool for a minute then push gently with your finger. If it wrinkles then it's done, if not then boil for another couple of minutes. Alternatively if you have a sugar thermometer it will be done when it reaches 104.5C.
Once it's done, take the marmalade off the heat and cool for 10-12 minutes before pouring into your sterilised jars and sealing immediately.
Then marvel at the stained glass effect you get when you put the jars up against the window!

Wednesday, 16 March 2011
The first batch of brownies...sort of...
After our market research on Saturday, we think that there might be a gap in the (farmers') market for a stall selling brownies and tray bakes - sweet mouthfuls that people can enjoy with a cup of tea or even to eat on the way round browsing the rest of the stalls at the market. With this in mind comes my two favourite parts of the process - baking and tasting!
So I pull down all my recipe books from the shelves and decide to start the hunt for the perfect signature brownie. And there are many recipes to choose from that all have me salivating, spiked with all different kinds of nuts, flavoured with orange zest, caramel, differing degrees of chocolatiness and fudginess, topped with After Eight mints.... I think I might need to host a dedicated brownie party in order to choose between them :o)
And after all that, the recipe that sprung out at me wasn't for a brownie at all, but a blondie. Like a brownie, but flavoured with brown sugar and vanilla instead of chocolate. Despite being a brunette myself I don't discriminate, and the need for me to try Rachel Allen's recipe for Peanut Butter and White Chocolate Blondies from her lovely Bake book was just too hard to ignore.
The recipe was pretty easy to follow and put together, although I didn't have the right size cake tin. Undeterred, I used my trusty swiss roll tin and fashioned a "wall" out of tin foil that worked a treat and 40 minutes later delicious aromas were wafting from the oven as I pulled out the first batch. I'm ashamed to admit that I couldn't wait for them to cool down and burnt my finger breaking off a sneaky corner to taste - mmmmmmmmm. Yep they were goooood. Buttery, laced with vanilla but balanced by the salty peanuts, fudgey in the middle and perfect with a cuppa in my favourite mug:
 The only thing that I would do differently is to chop the white chocolate bigger so that it adds more texture - it seemed to melt away into the blondie. Oh well, I'll just have to bake another batch....
So I pull down all my recipe books from the shelves and decide to start the hunt for the perfect signature brownie. And there are many recipes to choose from that all have me salivating, spiked with all different kinds of nuts, flavoured with orange zest, caramel, differing degrees of chocolatiness and fudginess, topped with After Eight mints.... I think I might need to host a dedicated brownie party in order to choose between them :o)
And after all that, the recipe that sprung out at me wasn't for a brownie at all, but a blondie. Like a brownie, but flavoured with brown sugar and vanilla instead of chocolate. Despite being a brunette myself I don't discriminate, and the need for me to try Rachel Allen's recipe for Peanut Butter and White Chocolate Blondies from her lovely Bake book was just too hard to ignore.
The recipe was pretty easy to follow and put together, although I didn't have the right size cake tin. Undeterred, I used my trusty swiss roll tin and fashioned a "wall" out of tin foil that worked a treat and 40 minutes later delicious aromas were wafting from the oven as I pulled out the first batch. I'm ashamed to admit that I couldn't wait for them to cool down and burnt my finger breaking off a sneaky corner to taste - mmmmmmmmm. Yep they were goooood. Buttery, laced with vanilla but balanced by the salty peanuts, fudgey in the middle and perfect with a cuppa in my favourite mug:

Subscribe to:
Posts (Atom)