I get a few unusual requests for cakes sometimes, which actually suits me down to the ground as I love flexing my creative muscles to make a cake that is a bit out of the ordinary. Over the last week I have made two cakes on a tipsy theme - a bottle of Grey Goose vodka and a packet of Marlboro Lights for a 40th birthday cake, and a giant pint of Guinness cake which I made for Melissa to celebrate St Patrick's Day on Saturday.
As I'm writing this post I'm getting hungry again and might just have to cut myself another slice of the Guinness cake before I tell you how I made the cakes....
I've made the vodka bottle cake before, so it was quite handy that I already had the label prepared. Usually I can find a suitable picture on Google Images but in this case I had to make it up from scratch which took more than 2 1/2 hours that I hadn't budgeted for - oops. Luckily after some good searching I was able to find the Marlboro images I needed, and with a bit of photoshopping I sent the pictures off to be printed into edible images at a local company in Newhaven. I got some slightly strange looks when I picked them up and had to assure them it wasn't a cigarette flavoured cake!
The cake itself is a vanilla madeira cake made from two 5" round cakes that I filled and cut in half to create the main bottle shape:
Then it just needed a small amount of shaping with a sharp knife to create the domed top and to make sure the sides were smooth and even. Once carved, the cake was then covered in a thin layer of buttercream:
The neck of the bottle was made from a sausage of marzipan, then I covered the whole thing in grey sugarpaste and trimmed neatly:
The cigarette packed was made from a rectangle of cake cut to just smaller than the image and covered in white sugarpaste. I've learned the hard way to always use plenty of icing sugar underneath so that when you come to move it to the board the sugarpaste doesn't stick to the surface.
The surface of the sugarpaste is dampened with a little water before fixing the edible image (see my Monkey Street Art post for top tips on using edible images):
The bottle label is added to the cake in the same way and the cigarette packet is secured to the board with a little icing.
A few finishing touches and a happy birthday message in royal icing and the cake is finished:
I think making this cake gave me the inspiration for the Guinness cake, and I instinctively knew that the recipe I had to use was Nigella's Chocolate Guinness Cake. I'm not a huge fan of chocolate cakes, but this one is a little bit different - moist and dark, with a hint of bitterness coming from the Guinness and then lashings of cream cheese icing really makes it a special cake. Nigella's recipe is for a 9" round cake, which I split between a 5" and a 6" tin to give the basis of the famous pint glass shape.
This is quite a damp cake and not really suitable for carving, but I had my heart set on making this cake work and just took shaping the cake very slowly, glueing crumbs back on with a little more icing to fill in any holes. Usually you can freeze cakes before carving to make it easier, but I didn't want to risk the cream cheese icing in the freezer. I also stuffed cake crumbs on top of the layers of icing to make as stable a surface as possible for the sugarpaste as the icing isn't as firm or stable as buttercream (so also not really suitable for a carved cake like this!). Before I started carving I placed strips of greaseproof paper just under the edges of the cake which protect the board from crumbs and smears of icing. It doesn't look very pretty at this stage, but it's now got just about the right shape:
Then for a thin layer of icing so that the sugarpaste will stick and once that's smooth you can carefully remove the greaseproof paper and you will have a nice clean board underneath:
And then time for the sugarpaste - I like to use Renshaw Chocolate Sugarpaste which has a lovely chocolate flavour. I covered this up to nearly the top, then covered the top part with white sugarpaste for the head of the pint. I then cut through both layers of paste and removed the excess to give a nice clean line:
All that was left was to add the logo using some edible gold paint and some superwhite mixed with a dash of water to create the white for the writing.
And it just so happens that this is excellent timing as I am celebrating my blogiversary this week - one year of writing the Brighton Bakery blog. Thanks to everyone for reading, and I hope you all have a pint of cake to celebrate with me!
Showing posts with label 40th birthday cake. Show all posts
Tuesday, 20 March 2012
Saturday, 4 February 2012
Mighty Mo - monkey street art birthday cake for David
I don't know why January has a reputation for being boring, miserable and staying indoors - last Saturday Melissa and I were back up in the big smoke for our third London party in as many weeks. Our good friend David turned 40, and to celebrate he invited his friends and family and threw a lavish party with a film screening and a slap up 3 course meal in a top London hotel - he really spoiled us all.
A few of us clubbed together to get David something really nice, and part of the gift was a Brighton Bakery birthday cake (I happen to know the owner there so can get a good discount haha). David really loves monkeys and I toyed with the idea of creating a carved cake in the shape of a monkey - that would have been pretty cool, but if it went wrong it could have looked a bit...special. David collects and is a big fan of street art and I thought I could make a cake in the shape of a brick wall with a Banksy style image on it, but that idea still didn't seem quite right. Then Melissa told me that David really liked a particular graffiti artist called Mighty Mo who paints his iconic monkey across London, and he'd recently bought one of his prints. This was the perfect image for David's cake, and along with a cheeky message this would be something he would really like.
Back before Christmas I made a vodka bottle cake and used a local company who print edible images onto sugarpaste to print the label. It turned out really well, so I thought I would use the same technique for this cake. I never did a post for the vodka cake so here's the picture:
I'd made the trip all the way over to Seaford to get the image so I had to make sure the cake was good as I didn't have a back up. I started with an 8" square cake which I cut and reshaped into a rectangle and covered with orange brick coloured sugarpaste. I used my handy brick texturing tool to create the brickwork effect and then used a dry brush with some red colouring dust on top to create a bit more texture. The cake was then ready to add the edible image.
The image itself is on very thin sugarpaste which is very fragile and can be quite tricky to work with - once it's stuck you can't move it so you have to get it right first time. Here are my top tips:
1. Trim around the edge of the image on a flat surface using a cutting wheel, making sure you have a clean cut through the paste all the way around - you'll find you don't need to press too hard as it's very fine sugarpaste.
2. Put the image still with its backing into the freezer for exactly 90 seconds. This makes the image stiff so that the backing peels off easily.
3. While the image is freezing, dampen the area of the cake where your image is going to go with some moistened kitchen towel to make it tacky so that the image sticks.
4. Take your frozen image from the freezer after 90 seconds and quickly peel off the backing and set in place. Smooth gently with the side of your hands moving from the centre outwards to remove any air bubbles. By the time it is in place the image will have defrosted and gone soft again so be confident and work quickly.
I had planned to take plenty of pictures but our camera had run out of battery and I felt completely foolish. Luckily our good friend Jo had her camera at the party and has kindly allowed me to use her picture of the cake:
Thanks Jo!
I hear that David took the cake leftovers into work last week and it was all eaten up, and that's always lovely to hear.
David - happy 40th birthday, thanks again for inviting us to your party we had a fantastic time and so pleased you loved the cake.
A few of us clubbed together to get David something really nice, and part of the gift was a Brighton Bakery birthday cake (I happen to know the owner there so can get a good discount haha). David really loves monkeys and I toyed with the idea of creating a carved cake in the shape of a monkey - that would have been pretty cool, but if it went wrong it could have looked a bit...special. David collects and is a big fan of street art and I thought I could make a cake in the shape of a brick wall with a Banksy style image on it, but that idea still didn't seem quite right. Then Melissa told me that David really liked a particular graffiti artist called Mighty Mo who paints his iconic monkey across London, and he'd recently bought one of his prints. This was the perfect image for David's cake, and along with a cheeky message this would be something he would really like.
Back before Christmas I made a vodka bottle cake and used a local company who print edible images onto sugarpaste to print the label. It turned out really well, so I thought I would use the same technique for this cake. I never did a post for the vodka cake so here's the picture:
I'd made the trip all the way over to Seaford to get the image so I had to make sure the cake was good as I didn't have a back up. I started with an 8" square cake which I cut and reshaped into a rectangle and covered with orange brick coloured sugarpaste. I used my handy brick texturing tool to create the brickwork effect and then used a dry brush with some red colouring dust on top to create a bit more texture. The cake was then ready to add the edible image.
The image itself is on very thin sugarpaste which is very fragile and can be quite tricky to work with - once it's stuck you can't move it so you have to get it right first time. Here are my top tips:
1. Trim around the edge of the image on a flat surface using a cutting wheel, making sure you have a clean cut through the paste all the way around - you'll find you don't need to press too hard as it's very fine sugarpaste.
2. Put the image still with its backing into the freezer for exactly 90 seconds. This makes the image stiff so that the backing peels off easily.
3. While the image is freezing, dampen the area of the cake where your image is going to go with some moistened kitchen towel to make it tacky so that the image sticks.
4. Take your frozen image from the freezer after 90 seconds and quickly peel off the backing and set in place. Smooth gently with the side of your hands moving from the centre outwards to remove any air bubbles. By the time it is in place the image will have defrosted and gone soft again so be confident and work quickly.
I had planned to take plenty of pictures but our camera had run out of battery and I felt completely foolish. Luckily our good friend Jo had her camera at the party and has kindly allowed me to use her picture of the cake:
Thanks Jo!
I hear that David took the cake leftovers into work last week and it was all eaten up, and that's always lovely to hear.
David - happy 40th birthday, thanks again for inviting us to your party we had a fantastic time and so pleased you loved the cake.
Tuesday, 15 November 2011
Fishing Boat Cake - here's how I did it...
I was really pleased to be asked to make this cake by Clair, who wanted a special cake as a surprise for her partner's Alison's 40th birthday. A few weeks ago I met up with Clair for a consultation with a few ideas in mind - I thought it would be cute to have a sand beach at the bottom, with crabs, starfish, oysters and a chocolate wooden fishing boat on top. But after speaking to Clair, I realised that I had been rowing down the wrong river, as they love to fish in their white Hampton boat on the Norfolk Broads, where at the bottom the river is nothing but weeds! So a couple of dodgy sketches later (luckily my cake decorating skills are better than my drawing skills) we had the design nailed and I was really looking forward to making the cake. This is how it turned out:
The cake started with an 8" round zesty lemon madeira cake, which I filled and covered with lemon curd buttercream and left to firm up in the fridge for an hour or two.
To create a water effect for covering the cake, I mixed pieces of white, dark blue and green sugarpaste into some pale blue sugarpaste and kneaded it together. I didn't knead it too much so that when I rolled it out it had a nice marbled effect:
Then covered the cake, smoothed the sides with a polisher and trimmed off the excess:
I then left the covered cake in a cool dry place while I made the boat. I made this out of Rice Krispie Treats (recipe here) and carved into a boat shape:
I covered with a thin layer of buttercream and then with sugarpaste on all sides to finish it off:
I did the same with the cabin and fixed to the cake:
At this stage I did worry a little that the boat was oversized, but it needed to be this big in order to take the figure and it matched the proportions on my sketch so I carried on and added the keydetails to match Clair and Alison's own boat:
You can also see in the background the 3D '40' I made out of orange modelling paste. I added some nylon thread for a fishing wire to the 4 and left a long end for it to be attached to the fishing rod later.
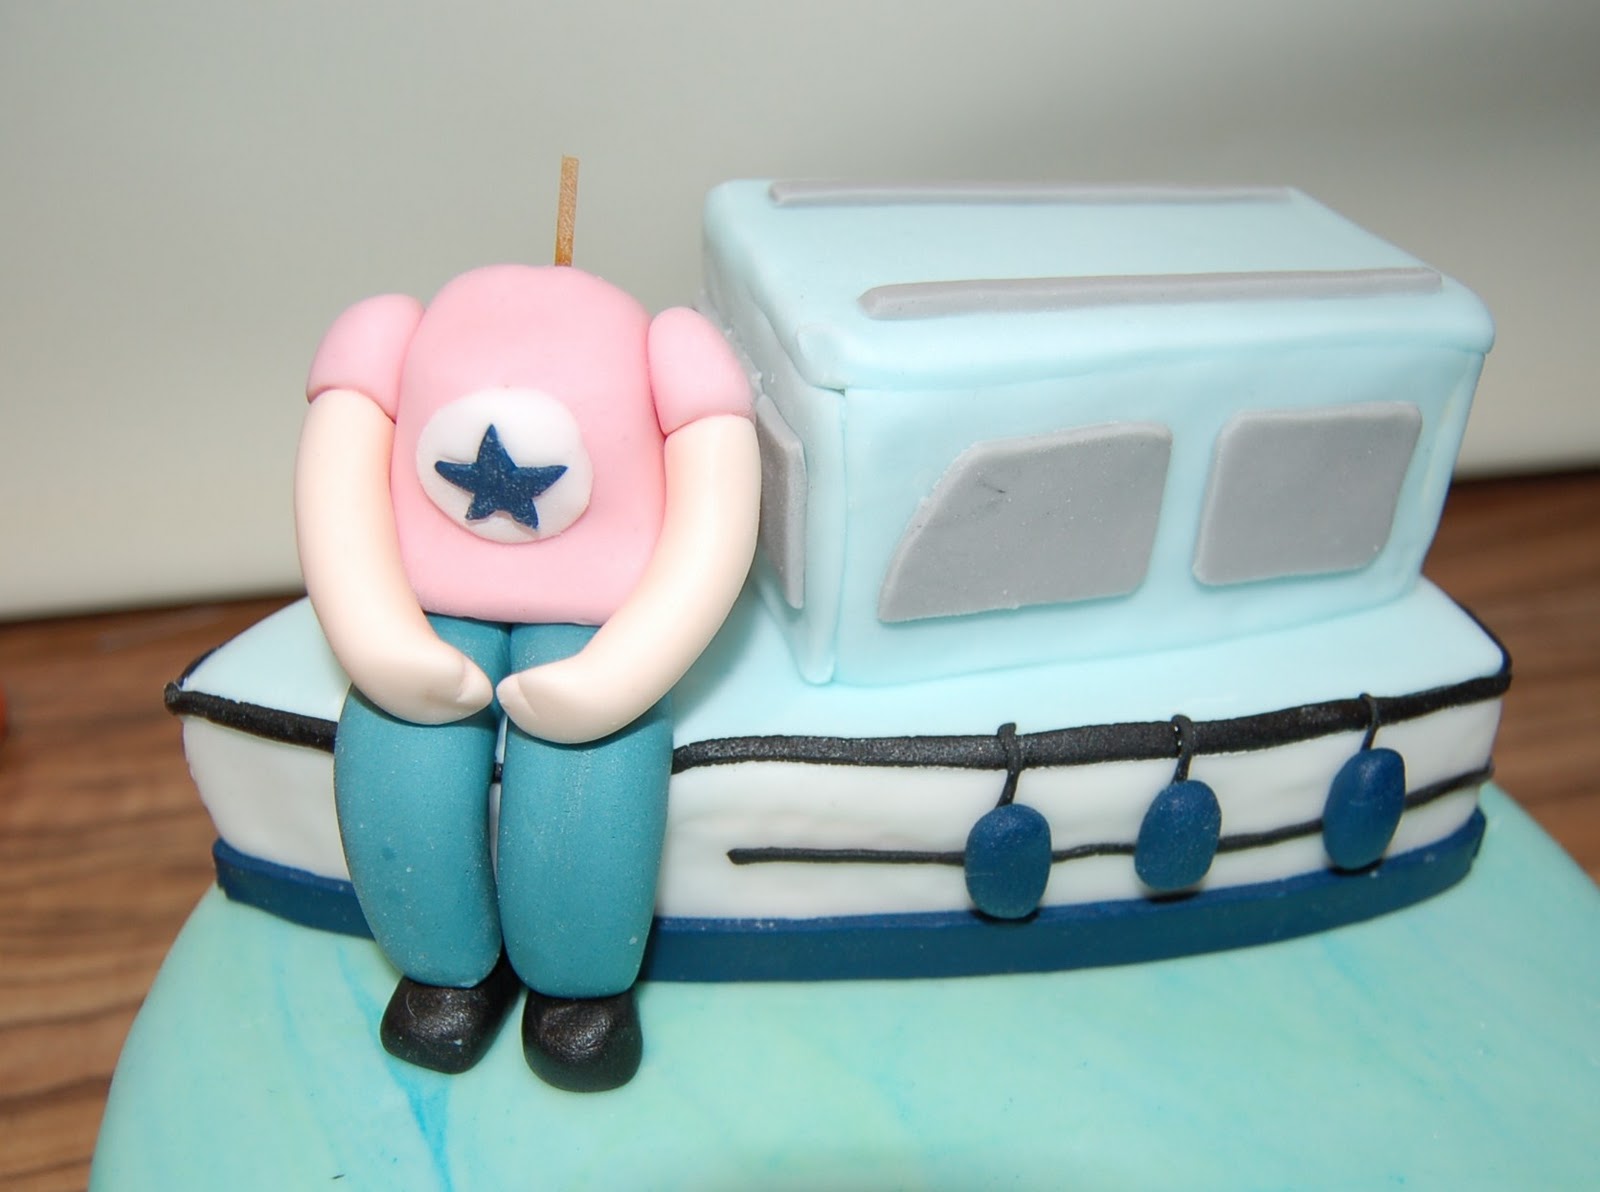
Next up was making the figure, which I decided to make straight onto the cake itself. The figure was deliberately out of proportion with the boat as this makes a stronger design for the cake as a whole. I find that often when designing cakes it's better to take key elements to give the essence of what you are portraying, rather than sticking rigidly to exact dimensions.
Using modelling paste (which is simply sugarpaste with some gum tragacanth added and left overnight) I started with the legs. These are made from a long sausage shape, with a notch cut from the middle and brought together. Further notches are cut from the back of each leg so they bend at the knee:
I made a body from a cone shape made out of pink modelling paste and secured the legs and body to the boat with a piece of dry spagetti straight down the middle:
The shoes were added with short pieces of spaghetti and edible glue and the star design on for the t shirt was also attached with edible glue.
I then added arms and sleeves with my favourite spaghetti and edible glue trick:
Ooh I love it when sugarpaste figures start to come to life!
Next I added the head and hair, which was made by pushing sugarpaste through a garlic press and cutting to length.
I sprinkled pearl lustre dust on the orange 3D '40' and cut at an angle to make it look like it was being fished out of the water. I secured these to the cake using lengths of dry spaghetti.
The fishing rod was made from a length of floristry wire covered with chocolate sugarpaste. I made sure the wire had an extra inch or two at the bottom to fix straight into the boat between the legs of the figure. The tricky thing was securing the end of the fishing wire to the top of the rod and keeping it taught. Sometimes gravity just doesn't like me.
And to finish it off, I added river weed details all the way round the sides of the cake and a wooden sign reading "Happy Birthday Alison" made out of chocolate sugarpaste.
Fishing boat cake - done!
The cake was collected the next day by Clair's sister in law and kept under wraps for a big surprise at the party, so I had to keep my fingers crossed that both Clair and Alison would like it. Later that day I got a text from Clair to say "The cake has been unwrapped and it was fabulous, absolutely perfect, Alison loved it and it tasted so nice, a great success, thank you so much."
I can't really ask for much better than that.
The cake started with an 8" round zesty lemon madeira cake, which I filled and covered with lemon curd buttercream and left to firm up in the fridge for an hour or two.
To create a water effect for covering the cake, I mixed pieces of white, dark blue and green sugarpaste into some pale blue sugarpaste and kneaded it together. I didn't knead it too much so that when I rolled it out it had a nice marbled effect:
Then covered the cake, smoothed the sides with a polisher and trimmed off the excess:
I then left the covered cake in a cool dry place while I made the boat. I made this out of Rice Krispie Treats (recipe here) and carved into a boat shape:
I covered with a thin layer of buttercream and then with sugarpaste on all sides to finish it off:
I did the same with the cabin and fixed to the cake:
At this stage I did worry a little that the boat was oversized, but it needed to be this big in order to take the figure and it matched the proportions on my sketch so I carried on and added the keydetails to match Clair and Alison's own boat:
You can also see in the background the 3D '40' I made out of orange modelling paste. I added some nylon thread for a fishing wire to the 4 and left a long end for it to be attached to the fishing rod later.
Next up was making the figure, which I decided to make straight onto the cake itself. The figure was deliberately out of proportion with the boat as this makes a stronger design for the cake as a whole. I find that often when designing cakes it's better to take key elements to give the essence of what you are portraying, rather than sticking rigidly to exact dimensions.
Using modelling paste (which is simply sugarpaste with some gum tragacanth added and left overnight) I started with the legs. These are made from a long sausage shape, with a notch cut from the middle and brought together. Further notches are cut from the back of each leg so they bend at the knee:
I made a body from a cone shape made out of pink modelling paste and secured the legs and body to the boat with a piece of dry spagetti straight down the middle:
The shoes were added with short pieces of spaghetti and edible glue and the star design on for the t shirt was also attached with edible glue.
I then added arms and sleeves with my favourite spaghetti and edible glue trick:
Ooh I love it when sugarpaste figures start to come to life!
Next I added the head and hair, which was made by pushing sugarpaste through a garlic press and cutting to length.
I sprinkled pearl lustre dust on the orange 3D '40' and cut at an angle to make it look like it was being fished out of the water. I secured these to the cake using lengths of dry spaghetti.
The fishing rod was made from a length of floristry wire covered with chocolate sugarpaste. I made sure the wire had an extra inch or two at the bottom to fix straight into the boat between the legs of the figure. The tricky thing was securing the end of the fishing wire to the top of the rod and keeping it taught. Sometimes gravity just doesn't like me.
And to finish it off, I added river weed details all the way round the sides of the cake and a wooden sign reading "Happy Birthday Alison" made out of chocolate sugarpaste.
Fishing boat cake - done!
The cake was collected the next day by Clair's sister in law and kept under wraps for a big surprise at the party, so I had to keep my fingers crossed that both Clair and Alison would like it. Later that day I got a text from Clair to say "The cake has been unwrapped and it was fabulous, absolutely perfect, Alison loved it and it tasted so nice, a great success, thank you so much."
I can't really ask for much better than that.
Subscribe to:
Posts (Atom)